
Shaping My Craft
- Brittney King-Robinson

- Jan 19, 2019
- 4 min read
BOY OH BOY do I have sooooo much to say!
So yesterday I attended a Best Buy workshop, while this was not the first one I’ve attended it was the first to this magnitude. I went to a beginners course they conducted a few weeks ago but this workshop was nothing short of AMAZING!! When you sign up for this workshop you pay only $50, but hey here’s to investment because it was well worth it!
We were directed to meet at the Best Buy on piedmont where a large charter bus met us. Once everyone was loaded we drove to downtown Atlanta to the workshop location. I couldn’t see well so all I captured was an iphone picture of the sign from the bus.

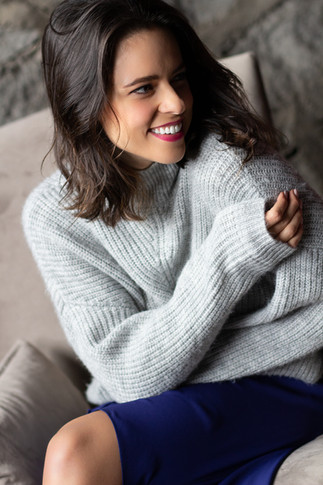
As I walked inside the beauty of the space captures my attention. We were directed to take a seat & waited to begin. Introductory speeches, bathroom break then we were split into group by color. My group started downstairs in the creative station. This station had two backdrops set up, a couch, chair & a ring light mini section. We had two models to work with. We had the option to check out some of the equipment they had which was really awesome. Meaning you do not technically need a camera to attend this workshop. I chose to try a 50mm f/1.4. The next-level accessories were LED Color Video Light like savage & light stands as needed. They split our group into two so we could work with a model each. The first model I worked with was absolutely breathtaking. She had a lot of energy, I prefer to work with models like her. She didn't need any direction & kept me intrigued. I captured her happy, outgoing, flirty personality in my photos. (see below)


When it was time to switch we went to shoot the second model. He too had a great personality, very easy to direct & had a nice smile. We got the opportunity to shoot him using LED light that changed colors. We kept it pretty simple for this model though. They showed us how to move lights to different positions to make different effect. Showing shadows by pointing the light source at the backdrop or model. (see below)


While we continued in the creative station, we switched to the last two sets. There was a set with natural light only. Then a set using just a ring light. Here we learned that we could really catch enough light by just changing our settings on our camera. Although it was a challenge we shot in AV, while adjusting the f-stop & ISO. Here the instructors asked us to play with our depth of field. To really focus on the on blurring out the background. (see below)


The ring light displayed a beauty affect in my images. It highlighted her makeup & accentuated her eyes. Take a look at these beauty shots! (see below)


I am learning to appreciate shooting close up. I use to be the "catch the whole body in the frame" type of photographer. I am learning that shooting close up shows the detailed beauty in the model's makeup, skin, hair & eyes. Never be afraid to get in your clients face, you can always edit blemishes or marks.
We got the opportunity to capture the female model in natural lighting as well. She was yet again very stunning & elegant in her posing. She is such a natural in front of the camera. We focused on the aperture again also learning different settings are required for different skin tones.


The second station was the close-up photo recipe. We focused on taking close-up photos of food, flower staged setups. The next-level accessories were small, portable lighting like a Lume Cube mounted on a tabletop tripod. The lens of choice was a 100mm macro. This station was more of a challenge for me due to using Manual focus. I haven't really shot in manual focus but I am happy I tried. Some of my work in this station shocked me. The staged tables were super cute and elegant. I am very intrigued by the 100mm macro lens and it will definitely be on my list of must buys.


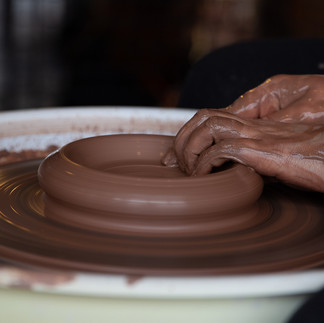
Station three was the Storytelling station. We got to watch a potter shape clay to make cups, bowl etc. Here we used a zoom lens of 24-70mm f/2.8. The potter was setup by a huge window that cast nothing but natural lighting. I used manual focus again in this station. I was able to work on blurring out the background & capture the constant movement of the potter & clay. I was not a huge fan of this station due to the lack of color. The background match the color of the clay, table & floor.
As I went through my footage I missed the point of this station. It was to tell a story! As I loaded this work I absolutely saw the story being told of the creation of pottery. How it was molded into a beautiful bowl. The motion of the spinner assisting the potter in shaping this item. Take a look! (below)


The last station was a selfie station, I mean who doesn't love a selfie? We were able to set up our cameras on tripods and handed a remote if we did not have an app on our phones. I shoot with a T5 so there is no wifi on my camera so I has to use a timer. I focus my camera on a chair, set the timer, press the button, then ran to position myself in the chair. This was absolutely funny to me, it was like a race against the clock before the camera flashed. I did not get any good images from this station. Even when I had others assisting me.When I loaded the imaged into lightroom they were blurry! I will have to work on more selfies later.
in closing I will repeat that this workshop was absolutely amazing. I highly recommend any beginner photographers to invest in yourself and take this workshop! I will continue taking it throughout the year to sharpen my skills. All of the images that were taken then loaded to this blog is straight from the camera. There was no editing involved. I hope you enjoyed! Have a Blessed one

Comments